Fruits, Herbs & Medicinal Plants
How to Grow Elderberry
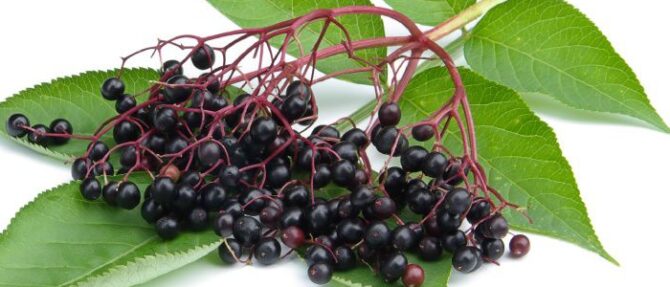
How to grow Elderberry, maintain Elderberry Plants and how to harvest Elderberries. Elderberry (Sambucus) is a large bush or shrub that is native to the U.S. and Europe. The bush produces purple-black fruit in bunches that are used in wines, juices, jellies, jams. It is also of great medicinal value and has many medicinal uses.
The two main species of elderberry used in commercial elderberry production are the European elderberry, Sambucus nigra and the American elderberry, Sambucus canadensis. Both Sambucus canadensis and Sambucus nigra have dark, black fruit with a purplish cast that produces a dark purple juice.
How to grow Elderberry from seed
- Elderberry seeds need the coldness of winter, or stratification, before they will germinate.
- For the stratification process, place the seeds in a plastic bag filled with a handful of slightly moistened soil and store it in the refrigerator at a temperature of 1 – 5 degrees Celsius.
- Leave the seeds in the refrigerator for 90 days.
- Fill a seedling tray with potting soil, leaving the top 1 inch of space free of soil. Tamp the soil down slightly and add more if needed to maintain the correct level.
- Fill the tray slowly with water from a watering can. Allow the excess water to drain through the tray’s bottom drainage holes. Add water a second time to ensure that the soil is evenly moist.
- Remove the bag containing the seeds from the refrigerator. Pour the contents out into a bowl. Sift through the media, pulling out the seeds as you find them.
- Sow the seeds in the tray, spacing them 2 inches apart from each other. Sprinkle a 1/4-inch layer of potting soil over the top of the seeds. Mist over the top layer of soil with water from a spray bottle to moisten the additional soil. Place a clear plastic cover over the top of the tray.
- Choose a room with a constant temperature between 22 – 26 degrees Celsius.
- Check the tray every three to four days for signs of moisture loss. Remove the cover, and mist the soil’s surface when the top 1/4 inch begins to dry. Water the soil to keep it moist. Do not allow the soil to become soggy.
- Watch for signs of germination four to six months from the planting date. Remove the cover once the majority of seeds germinate.
- Take the tray and place it in a sunny, warm spot after the cold stratification period has ended.
- Water the seedlings when the top 1 inch of soil becomes dry.
- Transplant the seedlings into individual 6-inch pots when they reach 3 to 5 inches in height. Fill the pots three-quarters full of potting soil.
- Dig a seedling out of the tray carefully with a trowel. Place the seedling in the center of a pot, spreading its roots outward. Add soil to the pot, tamping it down slightly around the roots. Do not overfill the pot or plant the seedling deeper than it was previously growing.
- Fill the pot one to two times with water to moisten the soil completely.
- Place the pot in a 21 to 23 degree Celsius room with partial sunlight.
- Acclimate the seedlings to full sun for two weeks before transplanting them outdoors into containers or into the garden.
- Plant them at least 10 feet apart in a sunny bed with mildly acidic, well-drained soil.
Maintaining Elderberry plants
Now that you know how to grow elderberry from seed, let’s look at how you can take care of your elderberry plants.
- Because elderberries have shallow roots, weeds can be a problem. Manually remove weeds when you see them or use mulch, like hay or bark chips, as a natural weed control.
- Keep them well watered, especially the first year after planting, because of their shallow roots. Elderberries need a lot of water, but once the roots have had a chance to anchor themselves, the shrub can handle periods of drought. The soil around an elderberry shrub should be moist, but not waterlogged.
- Elderberries are very tolerant of pruning, and doing so on a regular basis not only keeps plants dense and more manageable, but will also result in better fruit production.You can prune the plants in late winter or early spring while the plant is dormant and before leaves start to emerge.
- To stimulate fruit production, fertilize annually in early spring by applying a granular fertilizer formulated for trees and shrubs.
Harvesting Elderberry
If you want to harvest the flowers, collect them when they are in full bloom. Make sure to harvest the fruits when they are fully ripe. This is important because the berries are mildly toxic before they have fully ripened. The fruit of both S. nigra and S. canadensis should be a dark purple or black in color, soft, and juicy. Unripe ones will look green or pale purple.Harvest when the fruit is soft and dark purple in color. Remove the entire fruit cluster using pruning shears, just below the base of the fruits and then strip the berries.
You can preserve the berries by freezing them or dehydrating them. Elderberries need to be cooked, dried, or processed in some way before they can be consumed safely.
Disclaimer
Medicinal Information:
All medicinal information on this website is for educational and informational purposes only and may not be construed as medical advice. The information is not intended to replace medical advice or treatment offered by healthcare professionals.
Seeds, Plants, Plant Cuttings, Geophytes and Dried Herbs:
In some countries and provinces, certain plants are deemed as invasive and are not allowed to be planted at all, whilst some plants are allowed to be grown only in certain areas or provinces. The onus is on you as the buyer to familiarize yourself with the regulations pertaining to your location, before purchasing any of our seeds, plants, plant cuttings, geophytes or dried herbs. We will not be held liable, should you purchase any seeds, plants, plant cuttings, geophytes or dried herbs. from us which are prohibited in your country or province.

