Herbs & Medicinal Plants, Vegetables
Growing Burdock From Seed to Harvest
Discover the benefits of burdock in your garden. This vegetable is popular for its food uses and health advantages, making it a good choice for home planting. Whether you want to cook with its earthy flavor or use its health benefits, growing burdock from seed to harvest is a fun experience. With the right care and timing, you can have a good harvest.
Why Burdock is Special: A Great Food and Medicine Plant
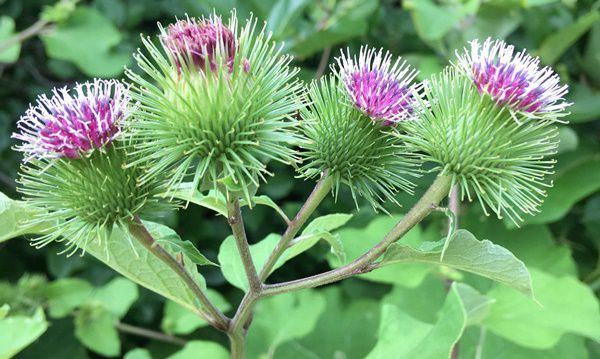
Burdock (Arctium lappa) has many nutrients, vitamins, and antioxidants. You can use its roots in stir-fries, soups, and salads, and its leaves can be made into tea. Many people use burdock for its health benefits. It is thought to help clean the body, improve digestion, and keep skin healthy. This useful plant is a great choice for any garden.
Growing Burdock
Indoor Sowing: Cold Stratification and then direct sow seeds in Spring.
Direct Sowing: Autumn.
- Burdock grows well in soil that is well-drained, loamy, and full of organic material. Here are some tips for the soil:
- Make sure the soil has a pH level between 6.0 and 7.0.
- Add compost to the soil to make it more fertile.
- Avoid using heavy clay soil that holds too much water.
- For indoor sowing, the seeds should be stratified first and then sown directly in spring after all danger of frost has passed. Alternatively the seeds can be direct sown in Autumn without cold stratification and germination will then take place the following Spring.
- For indoor sowing, first cold stratify the seeds in the fridge for 90 days. This mimics winter.
- Wet a paper towel and spread burdock seeds evenly on it.
- Roll up the towel and put it in a plastic bag.Put the bag in the fridge for 90 days.
- After the cold treatment, take out the seeds and plant them directly in the garden as burdock does not transplant well, due to its taproot.
- Put seeds in the ground about 1-2 cm deep.
- Leave 10-15 cm between each seed to give them room to grow. If they’re too close, they might fight for food and water.
- Keep the soil evenly moist until germination.
- Once the seed has germinated, young plants grow quickly but it takes some time to establish a taproot of sufficient size to harvest.
Maintaining Burdock Plants
- Burdock likes steady water, especially when it’s dry. Water well once a week, and more if it’s very hot. Don’t let the soil get too wet, as it can hurt the roots.
- Use a balanced organic fertilizer every 4-6 weeks. This helps the plants grow big and strong. Compost tea is also great for giving them the nutrients they need.
- Look out for common pests like aphids and beetles. Use soap or Neem oil to get rid of them if needed.
- Check for signs of root rot.
- Make sure the plants have enough space and good drainage to stay healthy.
Harvesting Burdock
Burdock roots usually take 10-12 months to be ready for harvest. Look for these signs:
- The leaves start to wilt and die.
- The roots are about 1-2 inches thick.
How to Harvest: Protecting the Roots and Getting the Most
- Use a garden fork to gently loosen the soil around the roots.
- Carefully pull them out to avoid breaking them.
- Clean the dirt off without using too much force.
Saving and Using Your Burdock: Ideas and Tips
- Keep the harvested burdock in a cool, dark place. It will stay fresh for weeks.
- For cooking, cut the roots into thin slices and stir-fry or add to soups. Try pickling for a different flavor.
Disclaimer
Medicinal Information:
All medicinal information on this website is for educational and informational purposes only and may not be construed as medical advice. The information is not intended to replace medical advice or treatment offered by healthcare professionals.
Seeds, Plants, Plant Cuttings, Geophytes and Dried Herbs:
In some countries and provinces, certain plants are deemed as invasive and are not allowed to be planted at all, whilst some plants are allowed to be grown only in certain areas or provinces. The onus is on you as the buyer to familiarize yourself with the regulations pertaining to your location, before purchasing any of our seeds, plants, plant cuttings, geophytes or dried herbs. We will not be held liable, should you purchase any seeds, plants, plant cuttings, geophytes or dried herbs. from us which are prohibited in your country or province.

